
Configuring Exchange 2010 NLB using Citrix Netscaler
This tutorial will instruct you how to install Netscaler and to configure this appliance to balance the load of Micsosoft Exchange 2010 Client Access Servers
Prerequisites
Configure DNS
Download/Install Netscaler VPX virtual Appliance
Register/Import licence (Free 1 year licence available on the Citrix website)
Export/Import Certificate into Netscaler
Create Services
Create Custom Monitors
Create Virtaul Servers
Configure Exchange 2010 IIS settings
Create Services
Create Custom Monitors
Create Virtaul Servers
Configure Exchange 2010 IIS settings
Configure DNS
Create an A record in DNS to point to the VIP (Virtual IP address) this will be the ip address that clients will use to connect to OWA, MAPI, IMAP4, SMTP. It is important that the FQDN matches the CN/SAN of the certificate. Also create an A record using the hostname that you will be using for your Netscaler appliance.
Download Netscaler
You will need to register on the Citrix website. The proceed to the download section and download a copy of the Netscaler VPX Express edition

There is no point in proceeding to the licence area at this time because you will need the hostname of the appliance and this is hardcoded into the appliance.
Install Netscaler VPX appliance
In this example I will be using ESX4i. Unzip the downloaded zip file. Open a connection to the ESX host using the Vsphere client. On the menu bar select File>Deploy OVF Template>Browse to the OVF file>Select next through the prompts. This will provision the Netscaler appliance. Establish a console connection to the netscaler device as you will need to give the appliance an IP address so that you can establish a connection to the device using the web interface.

Connect to the web interface using the ip address that you configured and login. If you have any problems connecting to the interface then make sure that you have java installed and add the url for the appliance to your trusted sites. The default credentials to logon to the appliance:
Username: nsroot
Password: nsroot
Upon login onto the appliance a wizard will start. Provide the device with a hostname using your organisations naming convention and an additional IP address that will be used as a management interface.
Ok, let’s get the information needed to obtain a valid licence from Citrix. You need the licence to enable the features within the appliance. On the main page locate the Host ID near the bottom of the page.

This is the Host ID used during the licence registration, and it is CASE SENSATIVE.
Obtain Netscaler licence
Navigate back to the citrix website in the same area that you downloaded the OVF file and click on the licence link.

You will then be presentenced with a licence key. Click on the licence key and fill out the information
Don’t be alarmed you will be asked for reseller information. Select the option cannot find reseller and complete the required fields. Enter the Host ID (Again it is case sensitive) and download your licence file.
Install Netscaler Licence file


Expand System>Click on Licenses>Click on Manage Licenses>Browse to the license
Configure Netscaler for name resolution
Configure the dns suffix of your domain.

Add DNS servers that netscaler will use to resolve hostnames to IP addresses. This should be your local DNS server; in my case my Domain Controller/DNS server is used.

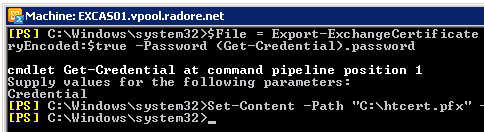
Export Exchange 2010 certificate
Display the installed certificates: More than likely you will use the same 3rd party certificate for all of your CAS. In my case I do so I am only required to export and import once.
Get-ExchangeCertificate -Server 'EXCAS01'

Export the certificate:
$File = Export-ExchangeCertificate -Thumbprint '03BB616D714D04D133FDACEC3B9476' -BinaryEncoded:$true -Password (Get-Credential).password Set-Content -Path "C:\htcert.pfx" -Value $File.FileData -Encoding Byte |

Import licence into Netscaler
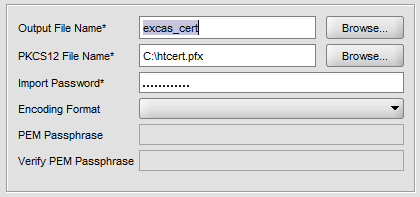
Click on the SSL directory and Select Import PKCS#12 (If are just setting up a test environment and you don’t have a certificate click on the “create and install a server test certificate”, name the certificate the FQDN used to access the server resources in question. In order to prevent the error message, export the certificate and copy it into the Trusted Root certificate store in the MMC.

Now import same certificate to Citrix Netscaler. Navigate to SSL and click import PKCS#12.

Choose your pfx file and give a name like excas_cert for local usage. Then navigate to SSL -> Certificates and click Add.

Netscaler will be used to offload all SSL traffic and will pass requests to the Client Access Servers using HTTP in the case of OWA.
Configure Additional Basic Features
Expand System> Settings>Click on Configure Basic Features>Place a tick in all the features

Ok, now we have the netscaler configured with core services. It is time to configure the Services and Network load balancing.
Configure OWA
First step is to create a re-write rule and policy. This will enable netscaler to append the OWA extension; rather than users having to enter the /owa suffix after the FQDN.
Expand Rewrite>right click actions>Select new>Create the Rewrite Action using the Screen shot
http.REQ.URL
String expression “/owa” (Don’t copy and paste)

Now create the Rewrite Policy
Right click on Policies and Add>Name your policy>Use the drop down box to select the action previously created (normally it is the last one in the list)>Enter the expression>Click on OK
http.REQ.URL.EQ(“/”) (Again don’t copy and paste)

Create the Load Balancing Service
You will need to create a service for every Client Access Server that will be a part of the NLB function.
Expand Load Balancing>Right Click Services and Add>Provide a descriptive name for the service>Provide the IP address of the server>Select HTTP for the protocol>in the list select the HTTP monitor and add (This sometimes did not work for me. If the service does not go green at the end of this tutorial then remove the HTTP monitor and add the HTTP-evc instead)>Select the advance tab>Tick Override global setting (the bottom option)>Tick use compression>>Click on OK ( Do this task for every CAS server that will be part of the NLB cluster)

Configure the NLB virtual interface
Right Click Virtual Servers and add>Provide a descriptive name>Enter the ip address that will be used to contact the virtual interface. (This IP address will not be bound to any server it should be dedicated to the VIP) >Place a tick in each of the CAS servers services>

Click on the policy tab>Click the rewrite (Request button)>Click the button insert Policy>From the list select the rewrite policy that you previously created>

Click on the Method and Persistence Tab>Change the method to Round Robin>Change Persistence to CookieInsert (change the timeout to 30 Minutes)

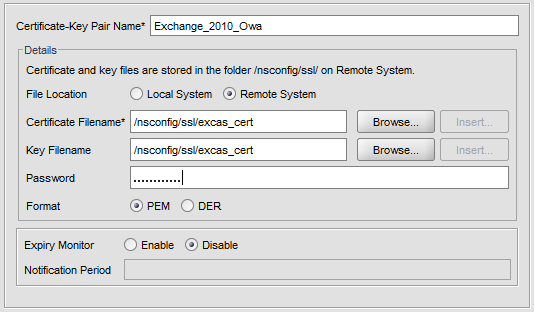
Select the SSL settings tab>Click on the certificate that you will be using and add it. Click ok to create the virtual server.

Configure IIS on each of the Exchange Client Access Servers
Navigate to the IIS administrative Tool. From here we are going to alter the SSL settings on the following sites:
Default Site
EWS
Exchange
OWA
Exchweb

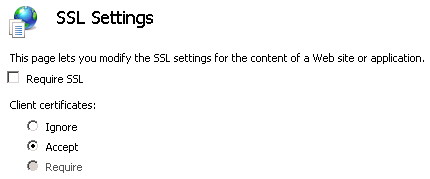
Select each site and Double-click the SSL Settings icon to bring up the detailed settings. As a default, you will see Require SSL is selected. Clear that check box (as show in our example), and click the radio button for Accept client certificates. Once you have done this, be sure to click the Apply action in the upper-right corner of the screen.
You will need to repeat the change to the SSL configuration in each of the other three folders referenced above.

Configure Exchange CAS to recognise that SSL service has been offloaded
This can be achieved by adding a registry key to each of the servers that will participate in the NLB cluster.
Open regedit and browse to the following path
Create a Dword (Don’t get it mixed up with Qword)

This will enable exchange to recognise that the server is offloading SSL traffic and prevents the server from responding to the queries with redirects that are in http mode
Configure Virtual Server for MAPI connections
First step is to create a custom monitor to monitor RPC traffic>Type TCP>Destination port 135>Click create

Now create a new service for each of your CAS>Provide a descriptive name>IP address of each of the CAS>Protocol TCP> Use a wild card * >Select the RPC_Monitor previously created and Add>Click on create

Create a virtual server for mapi connections>Provide a descriptive name>VIP address>Protocol TCP>Port wild card *>Tick the CAS services>

Click on the Method and Persistence tab>Method Select Least Connections>Persistence SourceIP>Click create

Configure MAPI virtual Server
Create a TCP level monitor for IMAP4 (optional)
NetScaler can create an extended TCP level monitor that can monitor the availability of the IMAP4 server banner through a TCP connection.
Navigate to Load Balancing > Monitors and click Add. Use the values in the following screen shots to create a TCP level monitor.

Click Special Parameters, and use the values in the following screen shot to create a TCP-level ECV monitor. Click Create to create a TCP level monitor for IMAP4

Create Services for IMAP4
Follow the same instructions that were used to create services for the OWA client. Navigate to SSL Offload > Services > Add and use appropriate IP addresses for the Client Access servers. Set the port to 143. Use the e2010_imap4 monitor that was created in the previous section.

Create an SSL virtual server
Follow the same instructions that were used for creating the OWA virtual server. Use port number 993 (standard SSL IMAP4 port). Use the Least Connection load balancing algorithm. (If you do not want to use SSL on the IMAP4 service then just create the virtual server using the standard 143 port)

Configure a SMTP virtual server
Create an application level monitor for SMTP
NetScaler provides application specific monitoring for SMTP servers. Navigate to Load Balancing > Monitors and click Add. Use the values in the following screen shots to create a SMTP monitor.

Creating Services
Follow the same instructions that were used for creating services for OWA client and use the appropriate IP addresses for the Edge Transport servers. Set the protocol to TCP and port number to 25. Select the SMTP monitor that was just created as the monitor for each of these services.

Create a virtual server
Follow the same procedure that was used for creating OWA virtual server. Use port number 25 (which is the port used for SMTP) and protocol TCP. Select the SMTP monitor and use the Least Connection load balancing algorithm.

If you are using the SMTP for application relay then you will need to add the Netscaler appliance's IP address to the allow list on the Recieve connector that is configured for application relay